Here is a link to a tribute video of BBC2's idents over the last 40 years
http://www.youtube.com/watch?v=aA18ZkIB5i8
Wednesday, 28 January 2009

Ident Research BBC 2
I hope to create something original and fun for my three idents.
I have been looking at idents that have appeared on BBC 2 over the years and have chosen a few of my favorites and posted them below.
This ident appeared on BBC 2 throughout the late 90's and was simple yet effective, it features the number 2 getting splashed with turquoise paint. Although seemingly irrelevant to BBC's programming, it was eye catching.

This ident was shown around the same time, and featured the number 2 getting dropped into a pile of white powder. However, on impact the number 2 created an explosion of blue which I feel was a nice effect.

The ident below was showing around Christmas time a few years ago, and shows the number 2 rising from the clouds. This ident was quite plain and just served as a reminder to viewers of which TV channel they were watching.

This ident was released last year and is rumored to have cost £50000!
This image is part of a few of BBC 2's new idents which is changing the way people view BBC. The robot style idents of the 90's are now gone and have been replaced with some more 'natural' idents. Another ident shown on BBC 2 show a car's wing mirror in the shape of a 2 driving along a motorway.

I have been looking at idents that have appeared on BBC 2 over the years and have chosen a few of my favorites and posted them below.
This ident appeared on BBC 2 throughout the late 90's and was simple yet effective, it features the number 2 getting splashed with turquoise paint. Although seemingly irrelevant to BBC's programming, it was eye catching.

This ident was shown around the same time, and featured the number 2 getting dropped into a pile of white powder. However, on impact the number 2 created an explosion of blue which I feel was a nice effect.

The ident below was showing around Christmas time a few years ago, and shows the number 2 rising from the clouds. This ident was quite plain and just served as a reminder to viewers of which TV channel they were watching.

This ident was released last year and is rumored to have cost £50000!
This image is part of a few of BBC 2's new idents which is changing the way people view BBC. The robot style idents of the 90's are now gone and have been replaced with some more 'natural' idents. Another ident shown on BBC 2 show a car's wing mirror in the shape of a 2 driving along a motorway.

Tuesday, 27 January 2009
27th January 2009 - 1st Lecture of Semester 2
After reading through the brief for semester 2, I will look into some current idents to get some ideas and then start developing my own in 3D S Max. After todays lecture, I have learnt how to animate a sphere and make it bounce. This will come in useful for my idents if I decide to produce an animation for a channel such as Sky Sports, as the sphere could be made into a bouncing basketball.
To basically animate a sphere, I used the timeline and autokey. By drawing a sphere and clicking autokey, I then made a keyframe on the timeline and was able to move the sphere up to the desired "drop" height. I then held down shift and copied the keyframe to the far end of the timeline to create the basic bounce. I then used the curve editor and dope sheet to tweak the bounce.

To basically animate a sphere, I used the timeline and autokey. By drawing a sphere and clicking autokey, I then made a keyframe on the timeline and was able to move the sphere up to the desired "drop" height. I then held down shift and copied the keyframe to the far end of the timeline to create the basic bounce. I then used the curve editor and dope sheet to tweak the bounce.

Wednesday, 26 November 2008
Overview
I have enjoyed this module and feel I have come along way in a short space of time.
I had never used 3D Studio Max before the start of this semester, and thanks to some help from my peers and few online tutorials, I have developed a sound understanding of the basics and I am looking forward to more complex modelling and animations next semester.
I had never used 3D Studio Max before the start of this semester, and thanks to some help from my peers and few online tutorials, I have developed a sound understanding of the basics and I am looking forward to more complex modelling and animations next semester.
Final August Image EDIT
By adding another Omni light and turning on the shadows, I have managed to get an even sunnier look to my beach scene, I feel this makes the scene far more effective. 
Final August Image
Here is my final 3D image to represent August. I have added a camera and used that as my viewpoint to give it a perspective view. The bucket has been coloured red and a raytrace map has been added to make it reflective. I have then tweaked the Phong shading and the specular and glossiness levels to get the right effect.

August Scene
For the August scene, I started out with a flat plane and using the same principles as my winter scene, pulled it around until I got the required effect.


I then added an image of a blue sky into the environment map.
After that, I created another plane and added a bump and a flat mirror from the material editor, this made the plane reflect the environment map which helped give the sea like effect to the plane.
I then created a sphere, and using the material editor, added an image of a beach ball. I tweaked this using the offset selection to get the image in the right position.
To make the boat on the horizon, I started off by drawing a box. I then converted it to an editable poly and selected cut. I drew a line down the front of the box and extruded it to make the front of my boat.
I then selected Boolean from the compound objects and copied the box. I made the copy smaller and then selected the original shape. I clicked Operand B and clicked on the copied shape to leave me with a basic boat.
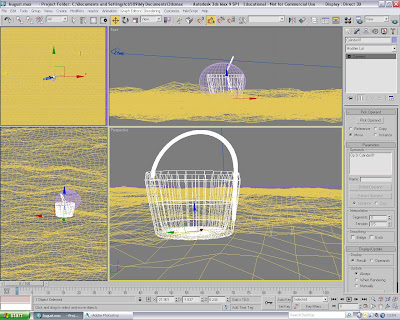
To make the bucket, I started off with a basic cylinder and put the cap segments up to 11. I then added some more sides to make it more circular. I then converted it to an editable poly and clicked on faces and selected the edges. Finally, I extruded the shape up and then added a mesh smooth.
To make the handle of the bucket, I selected splines from the shapes menu and drew an arc. I then went to the modifier list and opened up the Rendering drop-down menu. I clicked "enable in renderer and enable in viewport to make it 3D. Then I converted the arc to an editable poly ready for editing in my scene.
Subscribe to:
Posts (Atom)