Wednesday, 26 November 2008

Overview

I have enjoyed this module and feel I have come along way in a short space of time.
I had never used 3D Studio Max before the start of this semester, and thanks to some help from my peers and few online tutorials, I have developed a sound understanding of the basics and I am looking forward to more complex modelling and animations next semester.

Final August Image EDIT

By adding another Omni light and turning on the shadows, I have managed to get an even sunnier look to my beach scene, I feel this makes the scene far more effective.

Final August Image

Here is my final 3D image to represent August. I have added a camera and used that as my viewpoint to give it a perspective view. The bucket has been coloured red and a raytrace map has been added to make it reflective. I have then tweaked the Phong shading and the specular and glossiness levels to get the right effect.

August Scene

For the August scene, I started out with a flat plane and using the same principles as my winter scene, pulled it around until I got the required effect.
I then added an image of a blue sky into the environment map.
After that, I created another plane and added a bump and a flat mirror from the material editor, this made the plane reflect the environment map which helped give the sea like effect to the plane.
I then created a sphere, and using the material editor, added an image of a beach ball. I tweaked this using the offset selection to get the image in the right position.


To make the boat on the horizon, I started off by drawing a box. I then converted it to an editable poly and selected cut. I drew a line down the front of the box and extruded it to make the front of my boat.


I then selected Boolean from the compound objects and copied the box. I made the copy smaller and then selected the original shape. I clicked Operand B and clicked on the copied shape to leave me with a basic boat.


To make the bucket, I started off with a basic cylinder and put the cap segments up to 11. I then added some more sides to make it more circular. I then converted it to an editable poly and clicked on faces and selected the edges. Finally, I extruded the shape up and then added a mesh smooth.


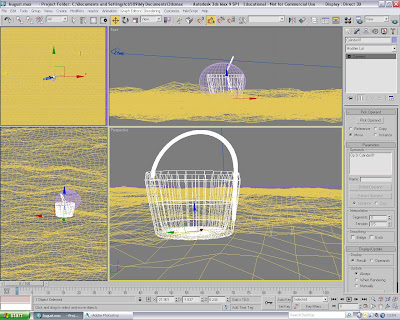
To make the handle of the bucket, I selected splines from the shapes menu and drew an arc. I then went to the modifier list and opened up the Rendering drop-down menu. I clicked "enable in renderer and enable in viewport to make it 3D. Then I converted the arc to an editable poly ready for editing in my scene.


Wednesday, 12 November 2008

Final May Scene

Here is my final image to depict the month of May:


I added a caterpillar to the leaf by creating spheres and grouping them together by selecting connect from the compound objects panel and clicking each sphere individually.

I then converted the object to an editable poly and extruded the faces to create the legs and the anteni. Finally, I added a marble effect to the caterpillar using the material editor.

May scene

Here are the steps used to create my forest scene to represent May:

1. I aquired a leaf from google images, and then traced along the leaf edge using splines.


2. I then converted the image to an editable poly and selected the edge verticies and used noise to get the crinkle effect. I also used UVW mapping to correctly apply the leaf texture.


3. By adding an omni light and turning on shadows I was able to get a realistic looking leaf. I also added a picture of a forest in the enviroments map to use as my background image.


I then drew a cylinder and added a bark effect in the material editor and then added a bump map to make the tree trunk appear textured.


4. To create the water droplets, I created a sphere and added a Raytrace base map and then tweaked the reflect and transparency to get the right effect.


I also used fog in the atmosphere effects panel and then added smoke from the environment colour channel to slightly change the background and make it more subtle.

Wednesday, 5 November 2008

Final Edit of December Scene


I have discovered a way to get rid of the block shadows on the snow which appeared after I added the blizzard.

By going to the material editor and selecting exclude, I was able to exclude the snow from the omni light meaning no shadows were cast over the falling blizzard. However, this made the blizzard appear black. So to counteract this, I then added another omni light and by including the blizzard this time, I was able to make the blizzard appear white again.

December Scene


Here is my final scene to represent December. I started off by creating a plane, and then converting it to editable poly and with soft selection selected, I pulled the plane around to make it look uneven. I created the snow by using the material editor and turning it white and then using the noise modifier, I was able to create a bumpy effect.

The snowman head is a sphere with the same principles added that I applied to my plane. I used spheres for the coal to represent the snowman's eyes and mouth, and a cone for it's nose.

I then added the tree I made, and added some falling snow using the Geomety menu, then using particle systems and selecting snow.

1st Attempt at creating a tree


Here is my tree I have used in my December scene. I started off by creating a cylinder, I then went to the Splines menu and drew on the branches using lines. The next step was to extrude the cylinder along the lines to make the branches 3D. I did this by converting the cylinder to editable mesh and by selecting the face that the line was attached to, I was able to click extrude, followed by the line to create my branches.

May Mood Board


Here is my mood board to represent May

August Mood Board


Here is my mood board to represent August

December Mood Board


here is my moodboard to represent December